
Install the awesome cool floating notification bell customization bar for blogger founded by HV Bloggers.
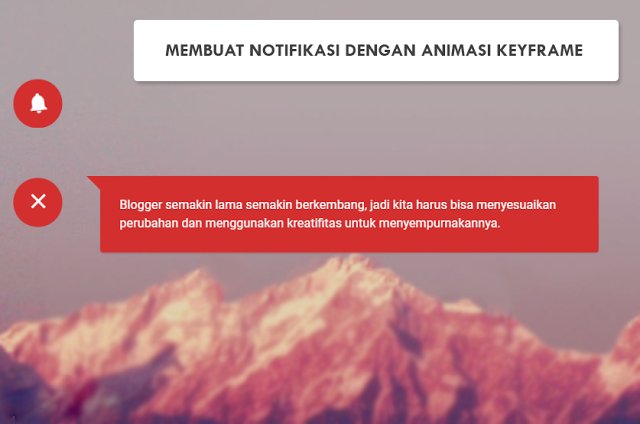
The idea of making this notification came suddenly 😲 and immediately I try to make it for me to publish on this blog. This notification is floating and the button I tried to plug in the middle left (maybe for the less fit can be changed position), in addition to the button and the notify box when the click shows the effect of soft and elegant (using keyframe animation).
INSTRUCTIONS TO INSTALL
Put CSS Material Icons just above the code</head>
<link href="https://fonts.googleapis.com/icon?family=Material+Icons" rel="stylesheet"/>
1. Enter the CSS code below just above the code ]]></b:skin>or</style>
/* BLANTER Notif Box Created by Idblanter.com */
#notif-wrapper{position:fixed;width:100%;z-index:999}
.blanternotif{background:#d32f2f;color:#FFF;width:50px;height:50px;border-radius:100%;position:fixed;z-index:999;bottom:45%;left:20px;-webkit-animation-duration:5s;-webkit-animation-iteration-count:infinite;-webkit-animation-name:notifklik;animation-duration:5s;animation-iteration-count:infinite;animation-name:notifklik;transition:all 5s ease-in-out}
.blanternotif i{color:#FFF;font-size:25px;margin:11px 10px 10px 13px;-webkit-animation-duration:2s;-webkit-animation-iteration-count:infinite;-webkit-animation-name:notificon;animation-duration:2s;animation-iteration-count:infinite;animation-name:notificon;transition:all 2s ease-in-out}
@keyframes notifklik{0%{transform:scale(1)}50%{transform:scale(1.2)}100%{transform:scale(1)}}
@keyframes notificon{0%{transform:rotate(-30deg)}50%{transform:rotate(30deg)}100%{transform:rotate(-30deg)}}
@keyframes notifbox{0%{transform:rotateZ(-45deg);visibility:visible;opacity:0;bottom:68%;left:78px}100%{transform:none;visibility:visible;opacity:1;bottom:41%;left:110px}}
.notifbox{padding:20px;border-radius:3px;position:fixed;resize:none;line-height:1.5;z-index:999;left:110px;bottom:41%;max-width:30rem;background:#d32f2f;border:1px solid #d32f2f;color:#fff;font-size:13px;box-shadow:0 1px 1px 0 rgba(0,0,0,0.07),0 1px 1px 0 rgba(0,0,0,0.06);display:inline-block;opacity:0;visibility:hidden;transition:.4s ease-in-out}
.notifbox:before{content:"";width:0;height:0;position:absolute;top:-.7px;left:-15px;border-width:8px;border-style:solid;border-color:#d32f2f #d32f2f transparent transparent;display:block}.blanterxE5CD{display:none!important}#notif-wrapper.aktif .blanterxE5CD{display:block!important;animation-name:none!important}#notif-wrapper.aktif .blanterxE7F4{display:none!important}
.notifbox.aktif{-webkit-animation-duration:1s;-webkit-animation-iteration-count:1;-webkit-animation-name:notifbox;animation-duration:1s;animation-iteration-count:1;animation-name:notifbox;transition:all 1s ease-in-out;opacity:1;visibility:visible}
@media screen and (max-width:680px){.notifbox:before{display:none}.notifbox{left:0%!important;bottom:0}@keyframes notifbox{0%{left:0!important}100%{left:0!important}}}
2. Put the following notification HTML code just below the code <bodyor above the code</body>
<div id='notif-wrapper'>
<a class='blanternotif' href='javascript:;' title='Notifications'><i class='material-icons blanterxE7F4'></i><i class='material-icons blanterxE5CD'></i></a>
<div class='notifbox'>
Blogger semakin lama semakin berkembang, jadi kita harus bisa menyesuaikan perubahan dan menggunakan kreatifitas untuk menyempurnakannya.
</div>
</div>
3. Put Javascript below just above the code </body>
<script type='text/javascript'>
$(document).ready(function(){$(".blanternotif").click(function(){$(".notifbox,#notif-wrapper").toggleClass("aktif");});});
</script>
Now save the template and done.
This notification can be filled with different messages in each post, my friend just need to change tutorial number 2, by simply moving the HTML notification code into the HTML mode post.
Comment below if you have any problems.


COMMENTS